• Facebook
  • Twitter
  • Pinterest
  • Email
  • Print
  • Skip to primary navigation
  • Skip to main content
  • Skip to primary sidebar
Frugal-Moms.com
  • Home
  • Start
    • Start Here
    • How I Got Started
    • About FMs²
    • Basics
  • Articles
    • Budgeting
    • Crafts
    • Decorating
    • Gardening
    • Holidays
    • Homesteading
    • Vintage
  • Meals
    • In Season
    • OAMC
    • OAWC
    • Planning
  • Recipes
    • Index
    • Appetizers
    • Breakfasts
    • Celebrations
    • Desserts
    • Drinks
    • Lunches
    • Main Dish
    • Sides
    • Snacks
    • Test Kitchen
  • Resources
    • Editorials
    • Forums
    • Reviews
      • Cookbooks
      • Gadgets
      • Goodies
      • Tools
    • Contact Us
    • Privacy Policy
You are here: Home / Featured / Kim’s Easy Homemade Pizza

Kim’s Easy Homemade Pizza

May 30, 2015 by Kim Gordon 14 Comments


Why order out when you can make chewy, gooey, delicious pizza for pennies at home?

Let’s talk pizza for a moment. Thick, gooey, fluffy dreaminess that you can really sink your teeth into. Not from a store or from a greasy take out place. But from your own kitchen. For pennies. No rising time. No kidding!

Yum

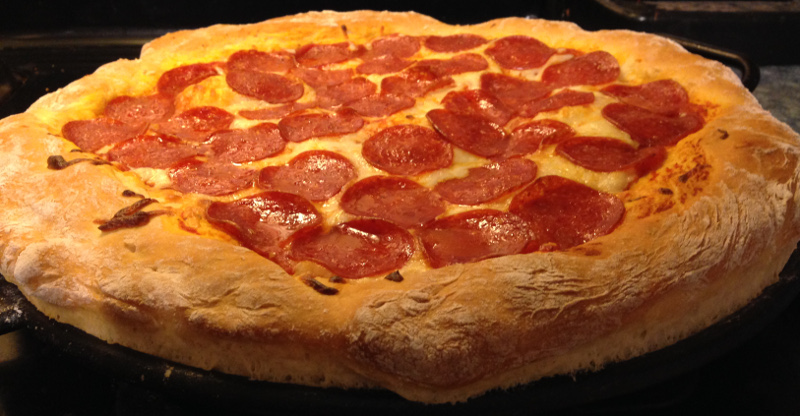
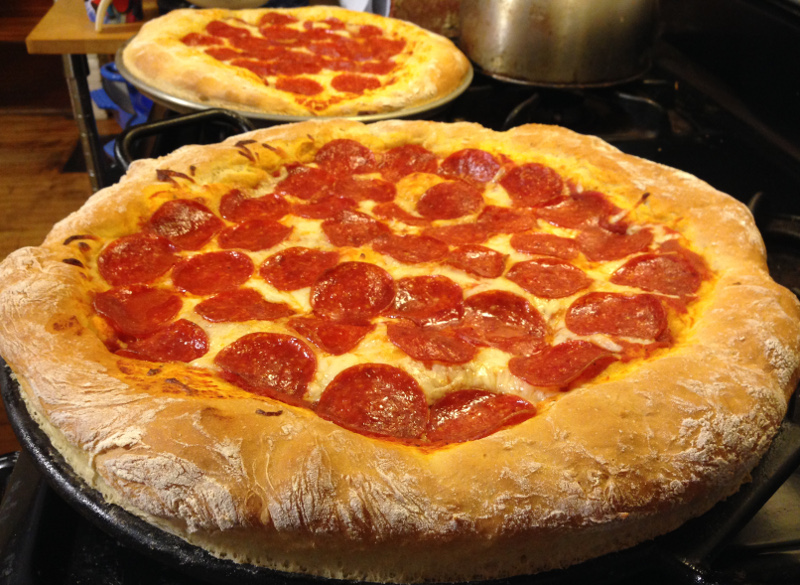
I’ve been making this pizza every week for 20 years; as a stay at home mom, as a working mom, rain or shine. I could probably make it in my sleep. It takes 20 minutes to prep, 20 minutes to bake. And it costs just $6 for two huge pizzas! The crust is wonderfully fluffy. The cheese is gooey and the sauce, oh my gosh the sauce is amazing. You can add whatever toppings you like, but everyone here prefers pepperoni, so that’s what I make.

The best ingredients don't have to be expensive.
The best ingredients don’t have to be expensive.

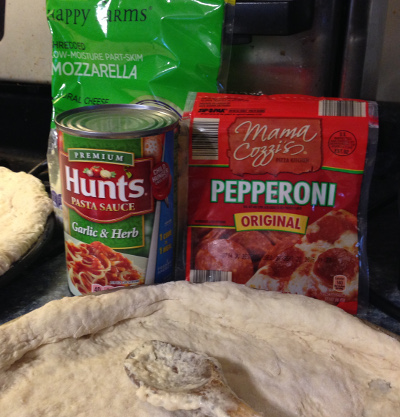
My weapons of choice when making these pizzas are easy to find. I buy shredded cheese and pepperoni from Aldi. We’ve noticed that other brands at other stores have a different taste. A bag of Aldi shredded mozzeralla is $2.99 and a bag of pepperoni is $1.99. The only other costs are the flour (about 50 cents worth), a small amount of yeast, sugar, and oil; and 1/2 a can of Hunt’s Garlic and Herb Pasta Sauce, which is usually on sale for $1.

This specific sauce has a bright, wonderful tomato taste without being sweet, like a lot of tomato sauces are. There’s just too much sugar and other junk in many canned sauces, and not enough real ingredients. But this one must be popular, because whenever Hunt’s Pasta Sauce goes on sale for under $1 a can, it’s the first flavor that gets cleaned out. I’ve found it on sale at Hy-Vee occasionally for 59 cents a can. I grab cases of it at that price! I also have a homemade version I’ll post in a few weeks when the herbs are at their peak. It’s close, and almost as good as Hunt’s. The recipe only needs half a can, so save the other half to dip leftover pizza crusts in (or for next week’s pizza!)

For some reason, last night’s pizza rose as high as the moon. I think the humidity had something to do with it, along with the fact that I’d just opened a fresh bag of flour. I also used honey this time, because we’ve cut out most of the sugar here and I didn’t have any. The yeast seemed to love the honey. You can see it already rising as soon as I had it in the pan! I buy yeast in bulk from Sam’s Club and it keeps forever in the freezer. It’s super cheap that way. But don’t use it directly from the freezer. It needs to thaw out and “wake up” first. So I keep a jar in the fridge to use for my baking (which is mostly pizza!)

Working the pizza crust into the pans. I especially love the Lodge Cast Iron pans and need to buy more of them. I always end up with one big pizza and one super puffy smaller one! Lopsided pizza goodness!
The pizza crust starts rising immediately after working with it. No rising time is needed.
The pizza crust starts rising immediately after working with it. No rising time is needed. The secret is in the consistency of the dough itself. Add flour a little at a time until it’s not sticky. You don’t want it stiff. You want it to be very soft, pliable and smooth. It may even feel a bit “loose” or “relaxed”, even floppy; like it’s not stretchy or elastic at all. That’s ok! As long as it doesn’t stick to everything and is soft, you’re good! The yeast will rise just fine if the mixture foamed up earlier.
This one got huge!
The dough last night was very loose, soft and pliable, and look at much it rose!

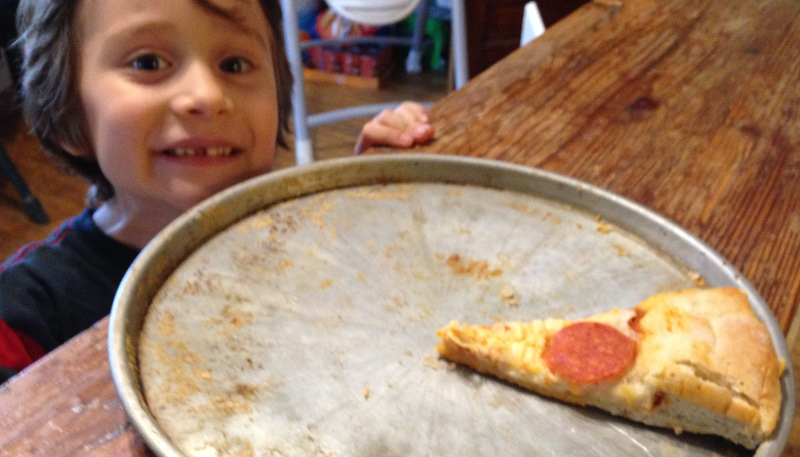
Leftovers keep well, but they won’t last. Last night, some nocturnal creature (probably a teenager) got up and ate almost all the pizza. Look who found the last slice!

Leftover pizza is an endangered specious here.
Leftover pizza is an endangered species here.

Anyhow, on to the recipe!


Kim's Easy Homemade Pizza
 
Save Print
Prep time
20 mins
Cook time
20 mins
Total time
40 mins
 
Make two delicious, chewy, gooey homemade pizzas for about $3 each and no rising time! This recipe serves about 8 people, unless you have teenagers and husbands with hollow legs, then it serves 6! (Ask me how I know this!)
Author: Kim
Recipe type: Dinner
Cuisine: American
Serves: 16 slices
Ingredients
  • For the crust
  • 2 tbsp baking yeast
  • 2 tsp sugar or honey
  • 4 tbsp oil (olive or vegetable oil)
  • 2 cups very warm water
  • 5-6 cups of flour
  • Toppings:
  • 1 can Hunts Garlic & Herb Pasta Sauce
  • 1 16oz bag shredded mozzarella
  • 1 bag sliced pepperoni
  • any other toppings of your choice
Instructions
  1. Preheat oven to 400 °F (204°C).
  2. Put the yeast, sugar/honey, and the oil in a very large bowl. Pour the warm water over it and stir until dissolved. Let sit in a warm place until foamy (about 5-10 minutes).
  3. Meanwhile, assemble the rest of your ingredients. Open bags, cans, etc. Grease 2 large round pans with oil and set aside.
  4. Once you have a bit of foam on the surface of your yeast mixture, it's go time! Stir 3½ cups of flour into the mixture with a large wooden spoon. The dough will be really sticky.
  5. Important: The goal is to add flour a little at time until it's soft, smooth and pliable; not sticky or stiff. You will learn to "feel" when it's right. So take your time adding flour. You can always add more but you can't take away. The consistency of the dough is the secret to this recipe!
  6. Add flour, about a half cup at a time, until the dough is soft, smooth and not sticking to the spoon. At this point, set the spoon aside and knead for a few minutes in the bowl with your hands, sprinkling more flour in to reduce the stickiness. Dough should stay soft and not be stiff.
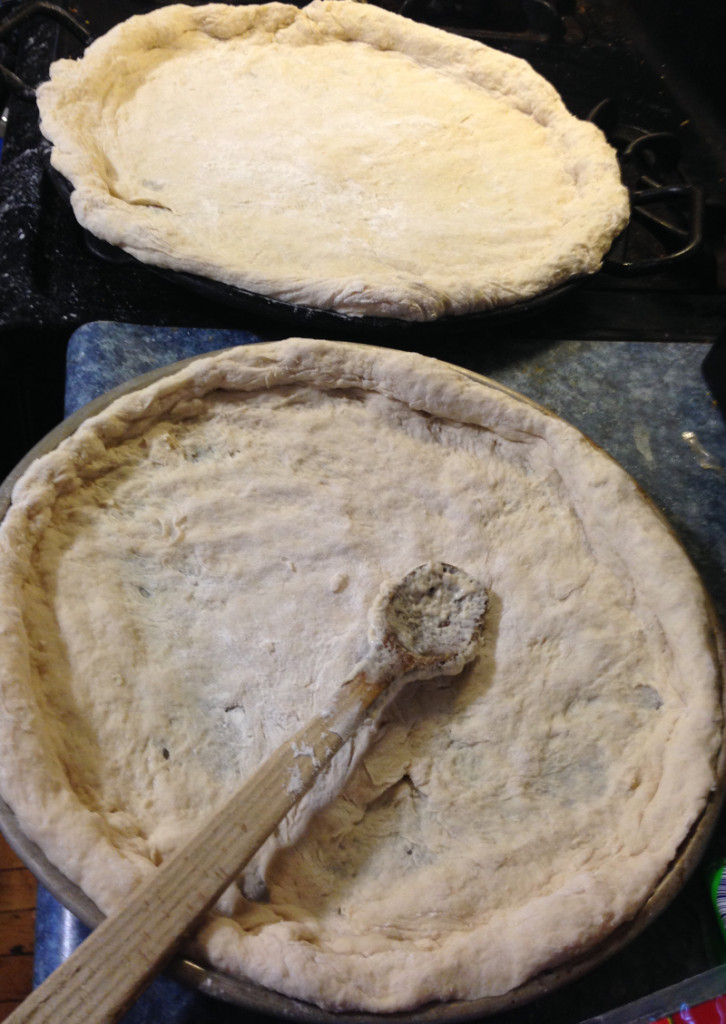
  7. Pinch dough into two halves. Sprinkle a little more flour on it and turn one ball onto the pan, working it towards the edges with your hands and adding more flour in small amounts as needed. Do this again for the second pizza.
  8. Spread about ¼ of the can of sauce onto each pizza crust. (I like to use the back of the same wooden spoon I used to stir the dough.)
  9. Sprinkle half the bag of mozzerella on each pizza, and top with pepperoni and any other topping of your choice.
  10. Bake at 400 degree for 20 minutes.
  11. Let cool for 5 minutes and serve!
Notes
-This recipe is very adaptable. You can substitute up to half of the white flour with whole grain flours and you'll still get a nice, fluffy crust. Over half, and it'll turn out denser but very good.

-You can use whatever sauce and toppings you like. You can make it vegetarian and even vegan by changing out the cheese to a non-dairy one.

-Please note that some vegetables will release water when they bake and make the pizza look a bit runny. If you cook a few extra minutes (perhaps lower the temperature the last few minutes), the water should evaporate.

-You can also use this pizza crust to make breakfast pizza and also cinnamon rolls. It's very versatile!

-I haven't tried using gluten free flours yet, but that's next on my list!
3.3.3077


Filed Under: Featured, Main Dish

Previous Post: « Cheap Thrills: Grocery Deals This Week
Next Post: Save Your FrugalMoms2 Recipes to Big Oven »

Reader Interactions

Comments

  1. Mahjong

    July 16, 2015 at 5:51 am

    Wonderful blog you have here but I was curious about if you knew of
    any discussion boards that cover the same topics discussed in this article?
    I’d really like to be a part of online community where I can get responses from other knowledgeable individuals that
    share the same interest. If you have any recommendations,
    please let me know. Kudos!

    Reply
    • Kim

      July 21, 2015 at 8:45 am

      Mahjong,
      Thanks! I’m glad you’re enjoying it. For online communities, check out our forums page here: https://www.frugalmoms2.com/forums/

      Reply

Trackbacks

  1. This Week’s Meal Plan | Frugal Moms 2 says:
    June 1, 2015 at 12:18 pm

    […] Chocolate Mint Brownie Overnight Oats (trying for first time, her other overnight oats are great) Kim’s Easy Homemade Pizza Portabello Mushroom Pizzas (using as a starting point) Carob Frosty (curious to see if it really […]

    Reply
  2. This Week’s Meal Plan and Shopping | Frugal Moms 2 says:
    June 9, 2015 at 2:58 pm

    […] Recipes: I have a few recipes I’m working on that I’ll post as soon as I have time to photograph and edit them. Chicken Pot Pie: coming soon Asparagus Soup: coming soon Apple Noodle Parfaits: coming soon Mom’s Curry Chicken: coming soon Mint Cacao Kiss Smoothie Cucumber Avocado Tuna Hand Rolls with Srichacha Vegan Brownie Batter Smoothie Kim’s Easy Homemade Pizza […]

    Reply
  3. Meals & Deals: Week of 6/14/2015 | Frugal Moms 2 says:
    June 14, 2015 at 9:29 pm

    […] stuff on clearance. I grabbed some gluten free flour so I can try making a gluten free version of my pizza. I’ll post the […]

    Reply
  4. Gluten Free Pizza- Try #1 | Frugal Moms 2 says:
    June 19, 2015 at 11:32 pm

    […] is my first attempt at gluten free pizza. I used my regular pizza recipe here, and simply substituted “Live G Free” flour from Aldi. which was on clearance for $1.99 […]

    Reply
  5. Meals & Deals: Week of 6/21/2015 | Frugal Moms 2 says:
    June 22, 2015 at 9:40 am

    […] Coming soon Kim’s 5-Way Chili: Coming soon The Carrot Cake Milkshake Peanut Better Balls Kim’s Easy Homemade Pizza Portabello Mushroom Caps Spiralized Potato Breakfast Pie woth Avocado and Fried Eggs Pork […]

    Reply
  6. Homemade Breakfast Pizza | Frugal Moms 2 says:
    June 22, 2015 at 9:33 pm

    […] breakfast pizza uses the same easy-to-make dough as my regular pizza recipe. You can even make the dough ahead of time or save leftover dough from pizza night for this recipe. […]

    Reply
  7. Meals & Deals: Week of 6/28/2015 | Frugal Moms 2 says:
    June 28, 2015 at 3:39 pm

    […] (tomato sauce, spices and porkchops in crockpot) Carrot Cake Milkshake (forgot to make last week) Kim’s Easy Homemade Pizza Portabello Mushroom Pizzas Stuffed Steaks- coming soon Flag Cake (the super simple easy one, not […]

    Reply
  8. Meals & Deals: Week of July 5th | Frugal Moms 2 says:
    July 7, 2015 at 1:21 pm

    […] Oatmeal– everything I’ve made from Katie’s website is amazing, including this! Kim’s Easy Homemade Pizza Portobello Mushroom Pizzas– I keep forgetting to make this. The recipe is a starting point. […]

    Reply
  9. Meals & Deals: Week of 7/26/2015 says:
    July 26, 2015 at 7:57 am

    […] Noodle Collard Wrap (recipe is below the video on how to make it) Brownie Batter Smoothies Kim’s Easy Homemade Pizza Fruit & Herb Flavored Water (fantastic and very versatile. Amazing recipes on The Yummy […]

    Reply
  10. Meals & Deals: Week of Aug 2 says:
    August 3, 2015 at 3:01 pm

    […] Chili Pork Stew (so good!) Raspberry Almond Overnight Oats  Italian Zucchini Pasta Spring Rolls  Kim’s Easy Homemade Pizza Brownie Batter […]

    Reply
  11. Meals & Deals: Week of 8/9/2015 says:
    August 9, 2015 at 9:50 pm

    […] Else: Kim’s Five Way Chili Kim’s Homemade Pizza Mom’s Awesome Curry […]

    Reply
  12. Meals & Deals: Week of 8/23/2015 says:
    August 31, 2015 at 4:23 pm

    […] Else: Asian Cucumber Noodles Apple Noodle Parfaits Kim’s Easy Homemade Pizza Banana Cream Pie Smoothie Pistachio Dream Smoothie Brownie Batter […]

    Reply

Leave a Reply Cancel reply

Your email address will not be published. Required fields are marked *

Rate this recipe:  

Primary Sidebar

Welcome Back

After 20 years, we’re still living better for less! Check out our newly relaunched forums and subscribe to our newsletter while we update our website and add new goodies!

With love,
Kimberly Gordon

Recent Posts

  • A Beginner’s Guide to Once a Month Cooking
  • OAMC: The Turkey Plan
  • OAMC: The Hamburger Plan
  • OAMC: The Ham Plan
  • OAMC: The Baking Plan
  • Plan to Eat’s Black Friday Sale!
  • Book Review: Positively Perfect by Claudia Svartefoss
  • Recipe Review: Compound Butters
  • Cookbook Review: Food Gift Recipes From Nature’s Bounty
  • Yes, I’m Still Alive
  • Back in the Saddle
  • Meals & Deals: Week of 8/30/2015
  • Meals & Deals: Week of 8/23/2015
  • Cookies & Cream Smoothie
  • Your Money or Your Life Wk 2: Money Ain’t What It Used to Be

Favorite Quote

Recent Comments

  • RITA ANDERSON on Gardening Review: Burgess Seed and Plant Company
  • these quotes on Your Money or Your Life Wk 2: Money Ain’t What It Used to Be
  • Angie deBorja on Gardening Review: Burgess Seed and Plant Company
  • HELEN ALLISON on Gardening Review: Burgess Seed and Plant Company
  • ernie morrow on Pineapple Mint Smoothies

Plan to Eat

We're on Plan To Eat.com!
Simple Meal Planning - Plan to Eat

Categories

Archives

Newsletter

Note: Some articles may contain affiliate links, which help cover our operating costs. 

Social

  • Facebook
  • Instagram
  • Pinterest
  • Twitter

Copyright © 2023 Frugal-Moms.com on the Foodie Pro Theme